Walkthrough
This walkthrough explains how to use mitmproxy-HTTPolice in various cases, but it does not explain mitmproxy itself. For best results, familiarize yourself with mitmproxy and its docs first.
Installation
Do this in a Python 3.6+ environment:
$ pip3 install mitmproxy-HTTPolice
If this is giving you trouble, see mitmproxy docs and HTTPolice docs for more detailed instructions.
Note
Do not use mitmproxy’s pre-built self-contained binaries. mitmproxy and HTTPolice need to live in the same Python environment, and this is only possible if you install mitmproxy from source via pip. See the “Installation via pip3” sections in mitmproxy docs.
Startup
Get the path to the mitmproxy-HTTPolice addon file with the following command:
$ python3 -m mitmproxy_httpolice
/home/vasiliy/.local/lib/python3.6/site-packages/mitmproxy_httpolice.py
Tell mitmproxy to load this file with the -s (--scripts) option,
like this (note the backticks):
$ mitmproxy -s "`python3 -m mitmproxy_httpolice`"
Or just put it into your ~/.mitmproxy/config.yaml:
scripts:
  - /home/vasiliy/.local/lib/python3.6/site-packages/mitmproxy_httpolice.py
Inspecting traffic on the fly
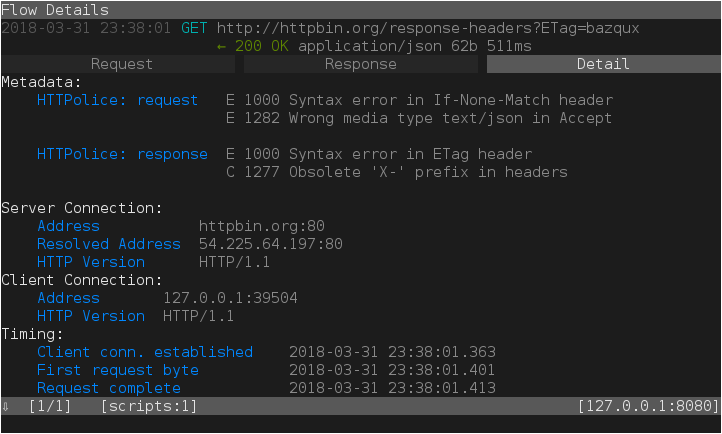
mitmproxy-HTTPolice checks every flow (exchange) and prints any results on the flow’s Details pane, under Metadata:
Marking flows with problems
From the flow list, how do you know which flows have any interesting notices on them?
HTTPolice can mark them for you if you set the option httpolice_mark.
There are several ways to set it:
From inside mitmproxy: with the options editor (by typing
O). The new value you set there will only apply to newly captured flows.On the command line:
$ mitmproxy --set httpolice_mark=comment
In your
~/.mitmproxy/config.yaml:httpolice_mark: error
httpolice_mark=comment means “mark any flows where HTTPolice has found
at least one comment or error”. httpolice_mark=error limits this to errors.
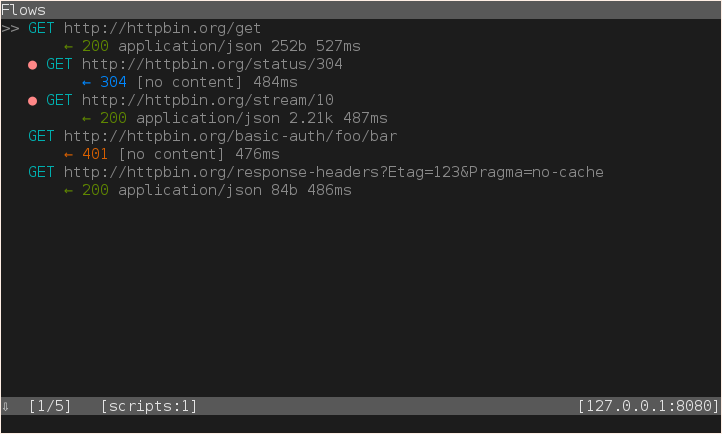
Marking flows is a general concept in mitmproxy. Marked flows have a big fat dot next to them in the flow list:
You can quickly run commands on “all marked flows”, for instance, to save them to a file:
: save.file @marked /path/to/marked.flows
You can also manually toggle the mark on any flow by typing m.
Silencing unwanted notices
With the httpolice_silence option, you can tell HTTPolice which notice IDs
to silence. They will disappear from flow details, and so on.
When editing this option in mitmproxy’s interactive options editor,
type a to add a new item, then type the notice ID, then Esc to commit.
Type d on an item to delete it. The new value you set
will apply to newly captured flows and newly produced reports.
In ~/.mitmproxy/config.yaml, notice IDs must be quoted so they are
treated as strings, not numbers:
httpolice_silence:
  - "1234"
  - "1256"
Full reports
If you prefer to see HTTPolice’s full HTML report, you can create one
with the httpolice.report.html command. For example:
: httpolice.report.html @all /path/to/report.html
Here, @all means “all flows”. You can replace it with any of mitmproxy’s
filter expressions, among them @marked for flows that have
been previously marked by HTTPolice.
There’s also the httpolice.report.text command if you want the plain
text report.
In-memory reports
In fact, you don’t have to go through a file to see the report.
You can put a dash (-) in place of the filename:
: httpolice.report.html @all -
The report will be stored in memory, and you can view it by visiting
/+httpolice/ via mitmproxy. If mitmproxy is running on
localhost:8080 in reverse proxy mode, then just go to
http://localhost:8080/+httpolice/ in your Web browser.
When in regular proxy mode, visit something like
http://example.com/+httpolice/ through the proxy
(the domain doesn’t matter, only the path).
Key bindings
Because httpolice.report.html is a normal mitmproxy command, you can set
key bindings for it. For example, if you put the following into your
~/.mitmproxy/keys.yaml:
- key: W
  cmd: httpolice.report.html @focus ~/report.html
then typing W (that is, Shift+W) will produce an HTML report on the currently
focused flow in ~/report.html.
Example workflow
Here’s one workflow that can arise from the features explained so far.
Let’s say you’re a developer (or tester) iterating on a piece of software that sends or serves HTTP requests, and you want that software to implement the HTTP protocol correctly.
First, set option httpolice_mark to comment,
and set a keybinding like this:
- key: f5
  cmd: httpolice.report.html @marked -
Then:
- Do something with your software, capturing a bunch of flows into mitmproxy.
- In mitmproxy, type F5. HTTPolice produces a report on all the problems found so far and stores it in memory.
- Open (or refresh)
http://localhost:8080/+httpolice/in your Web browser (tweak the URL as necessary) to read the report. - Fix the problems in your software, or silence them in HTTPolice.
- Now that you are done with that particular batch of flows,
type
zin mitmproxy to clear the flow list. - Rinse, repeat.
Non-interactive use
mitmproxy-HTTPolice is currently focused on interactive use.
Of mitmproxy’s three tools, only the original mitmproxy console UI
currently supports HTTPolice. mitmweb lacks the necessary features,
although it will probably catch up to mitmproxy eventually.
mitmdump is aimed at non-interactive use and HTTPolice doesn’t do
anything useful under it.
That said, you can get data from mitmdump into HTTPolice like this:
- Run
mitmdumpwith the--save-stream-fileoption to save flows into a file. - Run
mitmproxywith the--no-serverand--rfileoptions to load flows from that file. Of course, you may run it on another system. - Work in
mitmproxyas usual (: httpolice.report.html @all ...).